Saturday, 25 April 2020


WEEK 10 - 21/04/20

10 Best Process Images


Throughout my design process, I was deeply inspired by nature. Even though the shapes I used were not organic, I thought of how it could co-exist within nature.
I have chosen to go with a simple aesthetic throughout my work. The images are arranged in a way which shows how my models were able to evolve. 


Monday, 20 April 2020


WEEK 9 - 14/04/20


<Week 10 Submission Draft>


WRITTEN STATEMENT


Physical and Digital Materials


This term I was able to explore the usage of different materials and communicate a desired atmosphere through materials. Through model-making, I had chances of working with many types of materials such as tracing paper, boxboard and wire. From this, I was able to learn and use their individual qualities to create models that were best demonstrated in it. For example, wire is malleable and ductile which allows it to be bent into interesting forms using pliers. From the rendering with Photoshop, adding textures of materials digitally had allowed for the intended result of the space in real life to be illustrated. I was successful in combining both actual and rendered materials to represent my room.


BEST 5 HANDMADE MODELS


BEST 10 PROCESS IMAGES


PRESENTATION SLIDES


I'm thinking of not including the digital component below as I don't think I would have enough time to cover them in the presentation.


3D PRINT MODEL FILE


LASER CUT MODEL FILE


Monday, 13 April 2020


WEEK 8 - 07/04/20


Photoshop activity

This week we were asked to add materials onto the room to show the different textures of the walls, floor and other features. As shown in the videos, using layer masks are really helpful, however, it took me longer to make the selection for more complex parts. 

Sometimes I would not be able to use the quick selection tool or the magnetic lasso tool since the room and background were in the same colour, which made it hard for photoshop to detect the edges. I would then try to modify the brightness, contrast or colour balance on a different layer which would allow the quick selection tool to be used, then delete that layer. Even so, there are still times where that would not work which made me trace the space with the polygonal lasso.


For this picture, I decided to go for a more natural feel, using mainly different types and colours of timbers and bamboo.


For the bedroom, I tried to create a dreamy look to this space. Since I had used some hard looking materials for a wall and the floor (marble and tiles), I made the remaining walls out of plaster as it looks softer so the whole room doesn't look too heavy.
For the second picture, my tutor advised me of how the sky is looking a bit intense which draws the viewer to it instead. Therefore, I tried tweaking the saturation and lightness of the sky.


I've used colourful stone bricks for the exterior wall of the room with the extending threshold made out of wood, and canvas for the foldable blinds. I've chosen this background because I think it matches well with the materials of the building and the lighting goes well with how the lighting of the original picture was taken.


 Final Model


 Initial sketch idea for the model from week 6


Before creating the new model, I tried sketching my idea inspired by other precedents on pinterest. As I made my model throughout the weeks, I realised that while model-making, I would slightly alter my design while building as some of the elements in the sketch would not turn out as what I expected or was unpractical.

For the final model, I had tried to take pictures of the room from different perspectives and lighting to show night and day. I used natural light from the window, my night lamp for yellow lights and Christmas lights to be put inside of the room in the dark.

I had added an outdoor space with foldable blinds connecting to the door. Besides that, I also added some furniture to the room to show how the layout of the room.


Wednesday, 8 April 2020


WEEK 8 - 07/04/20


Fusion 360: Materials


For this model, I had used 4 types of materials;

White material - Jade (White)

Lighter pinkish material - Copper (Patina)

Slightly darker pinkish material - Copper (Raw)

Dark blue translucent material - Water (Calm sea)

Honestly, I'm not sure if we could use water as a material but I really liked the translucent quality and texture of it which allows us to see the inside details of the curves. I ended up choosing the colours and textures to what I liked and thought could match each other. I wanted to create something simple but not too boring. Since there's lots of curvilinear lines in my model, I've decided to put in some different textures to create some contrast and highlight the different curves.
I had took the images below through the capture image function shown in the tutorials instead of just taking a screenshot like I normally do.


Sunday, 5 April 2020

WEEK 7 - 31/03/20


Iterative Model with an additional source of natural light 


Scale 1:20

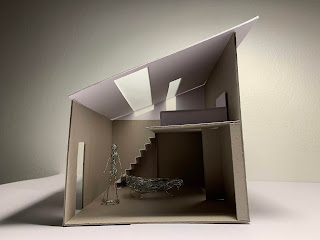
For this week, I remade the room neatly and used tracing paper for the glass of the window. Since I didn't have enough brown board at home and didn't know where to get them, so I got some white board paper from Officeworks which explains why my room is a mix of white and brown board. 

This turned out to be an advantage since the white board is about half the thickness of the brown board which allowed me to paste the tracing paper between two white boards to create the wall.

I've tried using wire to create a human figure and a sofa which turned out better than expected although it took a while to bend it. It took about 3 times to get the scale of the figure right.

I tried taking photos of the room with light sources both outside and within to see the different lighting results.


Fusion 360 Model in paper


Thursday, 2 April 2020


WEEK 7 - 31/03/20

Fusion 360: 3D Shapes


Small curvilinear object using initials ( T, E, Y )


This activity was quite interesting and fun to do. The width my shell is 0.8mm. It seems like due to the curving inside of the object, it would not allow for a thicker shell. 


WEEK 5/6 - 17/03/20, 24/03/20

Fusion 360 2.5d Shapes and Assemblies


Transition space


Layout of components


I realised that my components were too large so I laid it in an A1 sheet instead of an A2 sheet to output as a pdf.


Illustrator template - ready for laser cutting


The tutorial said that the laid out flat components should all fit within a 400x120mm rectangle, however since my components were too large so I made the green rectangle 350x450mm.


This activity took quite a while to get a hang of it and sometimes editing the sketch could get confusing but after googling the problems, I've managed to complete it. 


WEEK 5/6 - 17/03/20, 24/03/20 (REDO)


Fusion 360: 2.5d Shapes and Assemblies


Since my components were too large to fit the 400x120mm rectangle during the first attempt, I re-did the exercise so I would be able do the model in paper at the right scale.

Transition space


Layout for components


In A2 size for the PDF.


Illustrator template - ready for laser cutting


When I laid the components in Illustrator, I realized that 1 piece had the exact three layers, so I deleted them in Illustrator for the layout.


WEEK 10 - 21/04/20 10 Best Process Images Throughout my design process, I was deeply inspired by nature. Even though the sh...